How to Control Stepper Motor with Arduino?
Controlling a stepper motor with an Arduino is a simple task, as the Arduino has built-in support for controlling a stepper motor. In this tutorial, I will explain how to control a stepper motor with an Arduino and give you some example Arduino code to help you get started.
Hardware Requirements
To control a stepper motor with an Arduino, you will need the following hardware:
Connecting the Stepper Motor to the Arduino
The first step in controlling a stepper motor with an Arduino is to connect the stepper motor to the Arduino. To do this, follow the steps below:
- Connect the stepper motor to the stepper motor driver, following the manufacturer's instructions.
- Connect the stepper motor driver to the breadboard using jumper wires.
- Connect the breadboard to the Arduino using jumper wires.
Installing the Stepper Library
To control a stepper motor with an Arduino, you will need to use the Arduino Stepper Library. To install this library, follow the steps below:
- Open the Arduino IDE.
- Go to Sketch > Include Library > Manage Libraries.
- In the search box, type "Stepper" and press Enter.
- Select the "Stepper" library and click the "Install" button.
Setting Up the Arduino Code
Once you have installed the Stepper library, you are ready to set up the Arduino code. To do this, follow the steps below:
- Create a new sketch in the Arduino IDE.
- Include the Stepper library by going to Sketch > Include Library > Stepper.
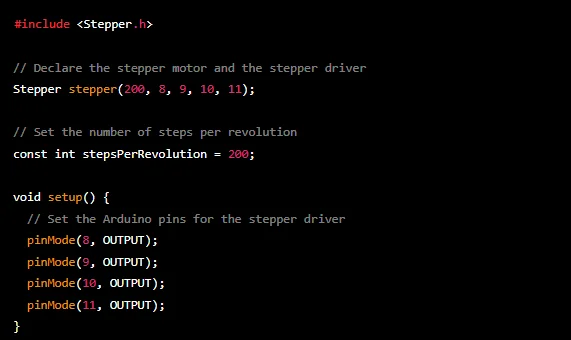
- Declare the stepper motor, the stepper motor driver, and the number of steps per revolution.
- Set up the Arduino pins for the stepper motor driver.
Here is an example of what the setup code might look like:
Writing the Arduino Code to Control the Stepper Motor
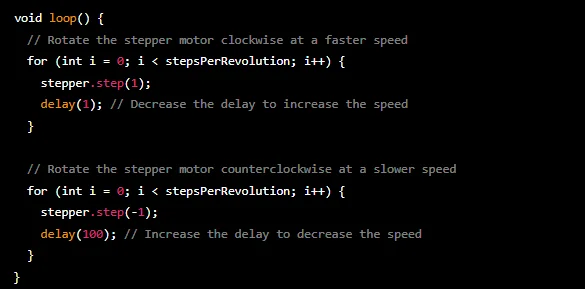
Now that you have set up the Arduino code, you can write the code to control the stepper motor. To do this, you will need to use the “stepper.step()” function, which moves the stepper motor a specified number of steps.
Here is an example of how you might use the “stepper.step()” function to rotate the stepper motor clockwise:

And here is an example of how you might use the “stepper.step()” function to rotate the stepper motor counterclockwise:

Adjusting the Speed of the Stepper Motor
You can adjust the speed of the stepper motor by changing the delay between steps. For example, to make the stepper motor rotate faster, you can decrease the delay between steps. To make the stepper motor rotate slower, you can increase the delay between steps.
Here is an example of how you might adjust the speed of the stepper motor:
Controlling the Stepper Motor with a Potentiometer
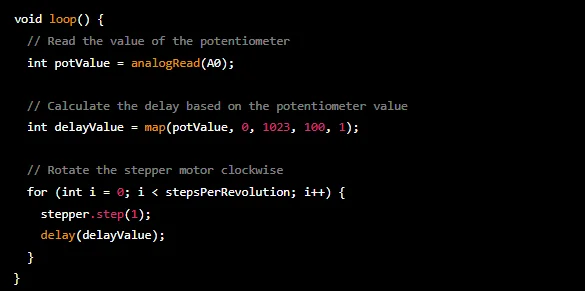
You can use a potentiometer (a variable resistor) to control the stepper motor. To do this, you will need to use the Arduino “analogRead()” function to read the value of the potentiometer and use this value to control the speed of the stepper motor.
Here is an example of how you might use a potentiometer to control the stepper motor:
Controlling the Stepper Motor with a Button
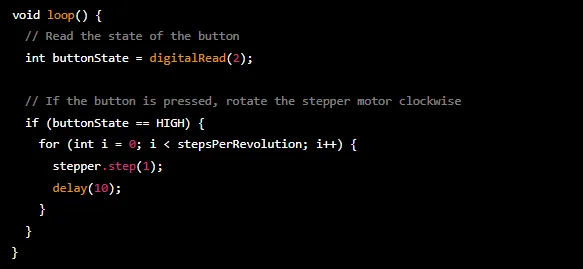
You can use a button to control the stepper motor. To do this, you will need to use the Arduino “digitalRead()” function to read the state of the button and use this state to control the stepper motor.
Here is an example of how you might use a button to control the stepper motor:
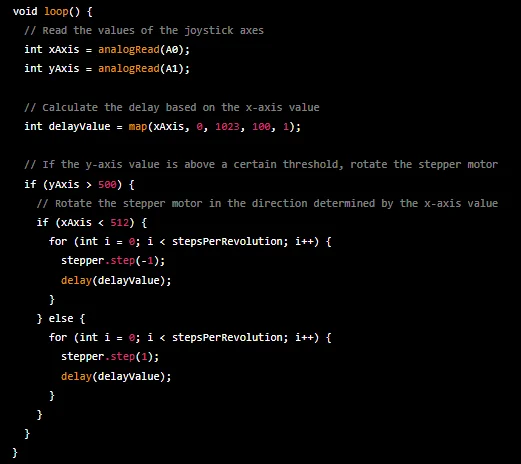
Controlling the Stepper Motor with a Joystick
You can use a joystick to control the stepper motor. To do this, you will need to use the Arduino “analogRead()” function to read the values of the joystick axes and use these values to control the direction and speed of the stepper motor.
Here is an example of how you might use a joystick to control the stepper motor:
Summary
This tutorial has provided a basic introduction to controlling a stepper motor with an Arduino. If you want to learn more about this topic, there are many resources available online, including the Arduino Stepper Library documentation and other online tutorials and forums.


